Showing posts with label Celebrations. Show all posts

Thursday, March 14

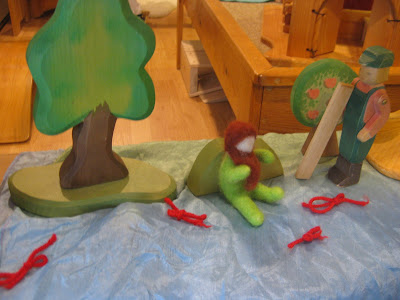
A Saint Patrick's Day Puppet Story For Children

In addition to our traditional Saint Patrick's day activity,
I also prepared a short little standing puppet show.  The story is based on a traditional Saint Patrick's day tale I found while searching online and my children loved it. 

Here is a quick version of the story:


One day a little leprechaun named Lucky, was admiring the pot of gold he had been collecting for a long time.  He had been keeping it safe in his home but began to worry that someone might find it and try to take it away.


Lucky took a walk to the woods where he looked around for the perfect hiding spot for his gold.  He saw a tall oak tree and decided he would hide his gold in the earth under the tree.


After his pot of gold was buried, Lucky felt his gold was safe and now no one would find it.


Just as Lucky was heading back to his home a Woodsman spotted him.  "I can't believe my luck," thought the Woodsman, "I have caught a leprechaun and now I will get his gold!"   The Woodsman danced with happiness and shouted, "I have found you leprechaun and now you must give me your pot of gold."  Lucky was very upset that he had been so careless and was caught by the Woodsman.  But, Lucky was also very clever, as all leprechauns are, and knew how to trick his way out of giving the Woodsman his pot of gold.


"You are right, Woodsman.  You did catch me and so now I must show you where I keep my pot of gold.  Here. I have buried it in the earth right here."  "Hooray", danced the Woodsman. Now I will have all of the gold I need."  "But, wait, dear Woodsman," said Lucky.  How will you dig out the buried gold?  You do not have a shovel?"  "You are right," said the Woodsman.  "Here, I will mark the spot of the buried gold with a red bow. Then, when I return, I will know exactly where the gold is buried."  The Woodsman laid the bow on the ground and set off to get his shovel.


"Ha, ha," chuckled Lucky as he quickly tied many more red bows and laid them on the ground.  Lucky tied and tied until the whole forest floor was covered with red ribbons.


When the Woodsman returned with his shovel he couldn't believe his eyes.  The whole forest was covered with red bows.  "Now how do I  know where to dig?" he shouted.


The Woodsman could not remember where the gold was anymore, there were too many bows.  He stomped off back towards his house while Lucky the leprechaun laughed at the trick he had used to keep his gold safe.


After I preformed the puppet show, I left out all of the pieces for the children to reenact the story.  They all loved the story and it has been used for two days, as well as an inspiration for various other puppet shows, too.


Friday, March 2

March Nature Table


We welcomed in March by changing the nature table.


Earlier in the year I needle felted this little leprechaun sitting with his pot of gold. During my explanation about leprechauns and St. Patrick's day, it was decided we should make some gold to leave for the leprechauns. There are hopes that on St. Patrick's day the leprechaun will visit, take our gold and leave a small gift in it's place, as a thank you.


We used some small rocks, glitter and glue to make gold for the leprechaun. We will just have to wait and see if he takes the gold and leaves a thank you! Of course, we are hoping he doesn't think we're playing a trick on him, and tricks us in return.


The rest of the nature table has nature found pinecones, dried grasses from a nature walk, wooden shapes like the squirrel, ladybugs (found occasionally at the dining room windows), soon to be seen worms, and the sun to represent daylight savings. Of course, we still have hints of snow on the nature table too, because around here, we'll be looking at that until April.

Monday, November 7

Made In China: Thoughts about Holiday Shopping

The holiday shopping season is almost in full swing. Our local food store already has candy canes! I can't help but think about the commercial and material overload that is out there already. Every year I try to find the balance between needs and wants, quality and quantity, what we give and what we get. This year, I am trying, more than ever to support local people and our country's economy. I'm thinking about quality toys made with loving hands close to home. I'm thinking about the process involved and the people who made the products. I am thinking about natural products that once lived and grew not far from here. I am thinking about spending carefully and thinking about the future.

In a world where 80% of toys made are made in China, a toy shopper has to be pretty selective. I am not saying we don't have toys made in China or that I have never bought them, but this year and this Christmas I am making more of an effort to not purchase these products and to pass the word. I think we are all aware of the recalls from toys made in China (almost 1 million toys in one Mattel recall in 2007 and there have been 17 in the past 10 years). But it doesn't end there. Consider these photos from toy factories in China.


(For more photos visit this link)

There are terrible working conditions the employees endure which have lead to riots and suicides at the factories. There are cases of child labor, dangerous chemicals, unsafe working conditions and much more. When I think about my child opening a toy on Christmas day I don't want it to be the result of someone's suffering or mistreatment. I don't want a special toy to be one that was handled with plastic gloves by someone wearing a face mask or the 1,000th toy that person made that day. So this year I will probably have to spend a little more time thinking about holiday shopping and then more time being selective in my shopping, but I think it will be worth it.


Friday, October 28

Craft: Wool Roving Spider Webs and Beeswax Spiders


We made some creepy spiders and spider webs this week as we anticipate the upcoming Halloween holiday. It was a simple and fun crafting time.


To make the webs, we found sticks during our morning outside time. I tied two together in an X shape (ahead of time so they were already for using) with embroidery thread. The other material needed is wool roving. My daughters looped and strung the roving around the sticks making a very tangled web.


After the webs were finished they chose a color of beeswax for the spider's body. Taking a small amount they warmed it in their hands and shaped the body. We chose a color of pipe cleaner for the legs and cut it into 8 small pieces. The pipe cleaner legs were inserted into the beeswax.


Another very small amount of beeswax created the eyes. The legs can then be bent in the middle so the spider can stand. Being familiar with Charlotte's Web, my daughters decided the spider needed some egg sacks as well.


My oldest daughter came up with the idea to wrap up a piece of beeswax in roving because this spider had caught a fly!


The Halloween spiders greet visitors at our window.


Although I think they look more cute than scary!

Tuesday, February 8

Valentine Mailboxes


We made our Valentine mailboxes in preparation for Valentine's day. Each member of the family decorated their box and from now to Valentine's day we can secretly make Valentines and put them into the boxes. We will open the boxes after dinner on Valentine's evening and read each one while enjoying a little Valentine's cake.


Our boxes are made from empty food boxes and one side is covered with some previously made watercolor paintings.


We cut out and tore tissue paper to decorate the boxes.


The boxes have each person's name on the top which also helps those learning to write names.


I also placed some blank index cards near the boxes to be used to make the Valentines.


This is the second year we've done family Valentine boxes and my daughters love it. It creates a wonderful anticipation and excitement. They also love being able to create and participate in such a caring way. I think some family members have a few Valentines already, and I'm sure the boxes will be filled by next Monday.

Wednesday, December 8

Holiday Traditions


We are getting ready to start our twelve days to Christmas countdown using the birthday ring. Just like last year, each night at dinner we add a candle and light it, followed by reading of a few verses from the bible as we progress through the story of the birth of the baby Jesus.


Another tradition we have is Christmas Eve books. Each Christmas I choose a special book for each child to open and read on Christmas Eve. My oldest daughter recently watched the movie Sound Of Music and so I am excited for her to open her Christmas Eve book My Favorite Things.


The illustrations and simple text are lovely.


My youngest daughter's Christmas Eve book is Snow.


I love the illustrations as well. I can't wait to sit down on Christmas Eve and read these books next to the tree.


Our tree is up and decorated and holds another tradition we have. Each time we go on a family trip we bring home an ornament. The ornaments are special reminders of family time together and memories we made. We remember the people we visited, who may not be with us on Christmas, or people who shared a trip with us. Our tree now holds these ornaments from the time before we had children to a special trip just this year.

Tuesday, November 23

A Thankful Coat

In preparation for Thanksgiving I hunted around the internet looking for a story I could tell my daughters that related to thanks and gratitude. I found The Thankful Coat written by Karen Harvey Cox on her blog Children's Writings. (Karen's blog is filled with her original short stories for children, as well as her artwork. The stories cover a variety of topics and are great for storytelling.) I knew when I read the story that my daughters would love it. It was simple, interesting and has a wonderful message that goes beyond just one day of thanksgiving: the more thankful we are, the more happy we become. I have included the story below and also some photos of how we made our own simple Thankful Coat.


Once upon a time there was a little boy named David. David had a very nice family, and he lived in a very nice house. David had a fun little sister, named Sally and a wonderful dog named Rusty. He had nice toys to play with and he went to the very best school. There was just one thing that David did not have, he did know how to be happy. Nothing seemed to make David smile, no matter what his mother, father, sister and even Rusty did, David was always unhappy. One day David was sitting on his swing in the backyard feeling sad. A little girl walked right into his yard and walked up to him and said, “Hi, my name is Sandy, have you seen the Thankful Coat around here?” David thought for a moment and said, “A Thankful Coat, I never heard of anything called a Thankful Coat. No, I haven’t seen one around here. What exactly does one look like anyway?” “Well”, said the little girl. “It is the most wonderful coat in the whole world. It makes you feel happy when you wear it.” David asked, “What color is it?” “Oh, it is the color of the rainbow”, said Sandy. “Come on, let’s look together to see if we can find it and then you’ll know what one looks like!” So Sandy and David looked everywhere. They looked behind the house. They looked behind the bushes. They looked all over the backyard. They looked and looked and looked. Suddenly, they heard such a commotion. All the birds, bees, bunnies, squirrels, butterflies, chipmunks, and even David’s dog Rusty were gathered around a large oak tree. There it was hung on one single branch of the oak tree…a beautiful coat. It was the color of a rainbow, just like Sandy had told him. The animals made beautiful sounds that sounded just like lovely music. “See David, here it is the Thankful Coat”, said Sandy. “Come on, let me put it on you and you’ll see it will make you feel happy.” So, David held out his arms while Sandy slid the coat over his shoulders and then he put one arm in one sleeve and then the other. David said, “Gee this coat feels nice, and I feel better, Sandy.” David felt very thankful all of a sudden. David was thankful for the beautiful blue sky. David was thankful for his new friend Sandy. David was thankful for his fun dog Rusty. David was thankful for his family. David just felt very thankful. The more thankful David became, the happier he felt. The happier he became the bigger his smile grew. David’s smile grew bigger, and bigger and bigger. Happy Thoughts popped up everywhere in David’s mind. David had found the secret to happiness, to wear the Thankful Coat. David was especially thankful to Sandy. “Sandy, thank you so much for this coat, I feel happy for the very first time in a very long time.” Sandy looked at David and said “I must leave now David, so that I can bring this coat to other unhappy children.” “What?” David said in disbelief. “How can you take this coat away, Sandy, I don’t want to go back to being unhappy.” Sandy started to smile and said, “Why David now that you know the secret to happiness is being thankful, you can make your own Thankful Coat to wear every day. Your Thankful Coat can be an imaginary one and you can make it any color you would like it to be. Every day when you get up you put on your imaginary coat and start to think of all the things that you are thankful for and you will be happy. David thought for a minute and he said, “I think my thankful coat would be blue with gold buttons.” Sandy said, “Now isn’t that fun?” Tomorrow morning you will get up out of bed and put on your imaginary Thankful Coat and think about all the things that you have to be thankful for, and you will be as happy as you are this very minute.” Sandy hugged David and said, “Goodbye, David I am so glad that you have the secret to being happy now.” David said, “Sandy I am so glad that you found the Thankful Coat and that you taught me how to make one of my own.” After Sandy left, David got out some paper, pencils and crayons. He drew a picture of a coat and colored it blue and made the buttons gold. He hung the picture in his room. The next morning David got out of bed, he looked over at his drawing hung on the wall, and he put on his imaginary Thankful Coat. To his happy surprise he started to feel happy. The more thankful he became the happier he felt. David’s smile got bigger, and bigger and bigger. David’s life became full of happiness and he remained happy for the rest of his thankful days.

I read The Thankful Coat to my daughters out loud before our painting time on our painting day. After finishing the story I presented the watercolor paper cutout in the shape of a coat. I explained that we were going to make our own Thankful Coat just like in the story.


We thoughtfully painted the coats. Each of my daughters wanted to make a rainbow coat just like the one Sandy had. After they dried we decided they needed buttons too. We glued on silver buttons (tinfoil circles) onto the Thankful Coats.


Our Thankful Coats now hang in a spot where we can see them and be reminded of how being thankful everyday can help us be happy.


Thank you to Karen for writing and sharing her stories and for her allowing me to share The Thankful Coat here.

Friday, November 5

Our Own Pumpkin Jack Or An Observation of Pumpkin Decay


Pumpkin Jack is one of our fall books. It is a great story of a young boy who carves a Jack O Lantern that he doesn't want to part with. With no better place for a pumpkin to end up after Halloween, he decides to put it in the garden.


We too have decided there is no better place for a pumpkin! My daughters have grown quite attached to their own Jack O Lanterns.


In the story the boy periodically visits Pumpkin Jack and notices the changes. We wonder what will our Jack O Lanterns look like. Will ours look like Pumpkin Jack? When we are out playing and come across our Jack O Lanterns in the field will there be evidence of animals visiting? Will they be food for insects? What will the inside look like when we take off the lid?


We will have to wait and see what will happen during the winter. And in the spring, will a little of our Jack O Lanterns remain? We can only hope for an ending like the book: A new pumpkin sprouting from a left over seed. Wouldn't that be magical!?

Wednesday, October 6

Our Halloween Countdown

My daughters get very excited for Halloween. Last year they really enjoyed the "countdown to Halloween" we used. For something new this year we are using this paper pumpkin countdown.


On our painting day (watercolors) we painted with red and yellow. After the paintings dried I cut out some pumpkin shapes. The following day I left the pumpkins out on the art cupboard for them to draw faces whenever they wanted. Soon we had all the pumpkin faces ready for stringing.


The pumpkins are strung up behind the nature table and each night after dinner one is removed. We count how many are left until Halloween! If you have a countdown to share, please do. Do you have other Halloween traditions in your home?

Wednesday, September 15

A Birthday Crown


We've got a birthday coming up this week. My oldest daughter is turning 5. Among other things part of our birthday tradition is having a birthday crown. Last year, I had made felt crowns for my daughters, which they loved and still wear all the time for dress up. This year, I thought it would be fun for my daughter to make her own crown.


I cut a piece of heavy watercolor paper into strips and used a white crayon to write names on the crowns (I knew my youngest would want one too and just maybe hers will last to October) Then they used watercolor paints to paint the crown. They loved seeing their names magically appear on the crown. My oldest daughter also enjoys using a dropper with the watercolors, which is what she is doing in this photo.


After she finished we let it dry and pieced it together to fit her head.


They both love the crowns. She will wear it for her birthday dinner, cake, presents and birthday ring celebration. We are all so excited. 5 is such a big number!

Monday, March 15

Colored Wooden Eggs


This weekend we dyed wooden eggs. I have seen the beautiful colored wooden eggs on Etsy and really wanted to see if we could make our own.


Using Rit dye from the craft store, I used 2 cups of hot water and about 1/2 a packet of powder dye. Once it was mixed and dissolved we floated the egg, turning it and drizzling water on top of it. Within a minute or two the desired color was reached and the egg was removed to dry.


We have used them in circle for a bird egg finger play we are learning this month and my daughters have been using them for "Easter" play.