Showing posts with label Art. Show all posts

Thursday, March 7

A place to create

I recently found a great deal on a Melissa and Doug workbench for kids.  The idea of a workbench was appealing but I wanted to use this workbench as a place for creating with all sorts of materials.  


The workbench is dedicated for creating and offers a variety of recycled and everyday materials for use in whatever way imaginable.  I envision it someday covered with markings and wear, showing evidence of projects past.  I want it to be a place where creativity comes first and making a mess isn't a concern.


Because I plan to stock it full of recycled materials for creating, I wanted to use some of these materials for organizing as an example of thinking "outside the box".  This shelf contains cotton balls, glue, markers, decorative edge scissors, google eyes, magnetic tape, pipe cleaners, popsicle sticks, tape, regular scissors, and left over craft projects to complete.


Below the work area is recycled cardboard, plastic containers, tin foil, cheesecloth, ribbon, and yarn.  And below that level are paper materials like magazines, colored paper, recycled envelopes, and newspaper.


My daughters have really been enjoying the space.  Very popular right now, is the magnetic tape which is magnet on one side and sticky on the other.  I cut it into small pieces and keep it in a box.  They love making magnets for the fridge and even came up with the idea of pipe-cleaner magnetic hearts.

Thursday, April 26

Drawing: Free Drawing and Form Drawing


A new addition to our drawing materials is a set of oil pastels and pastel paper.  My daughters have been using them every so often on drawing day and have enjoyed this new medium.  Originally, I purchased them because I liked the idea of blending and smudging to create new colors.


The pastels draw well, with bright colors and a smooth application.   They aren't too messy either.  We've found they are a nice change from crayons, markers and pencils every once and awhile.


In other news, my oldest daughter (6 1/2 yrs) has started form drawing.  I purchased Form Drawing for Beginners, by Donna Simmons because I actually know very little about this Waldorf method.  Form drawing is a therapeutic art, which among other things, helps the child improve and prepare for handwriting.


My daughter has really taken to it, she loves it and requests time to work on it.


The images beginning with straight lines and curves later move to running forms and then spirals.  They are very simple and are practiced several times, in the air, on large paper and then on smaller paper.  I like the way each form encourages slow, careful and deliberate movements.  Each form is structured and organized in a way that allows the drawer to focus and reflect requiring a peaceful environment- which is always a good thing.


I use an easel to draw the form and she stands and draws it in the air, on large paper, and later in her drawing journal.  We've also started coloring boarders around the work, in the traditional Waldorf fashion.   My forms aren't perfect and it is harder than it looks.  I always seem to find something that can be improved in each one, but it is fun having a challenge like that.

Thursday, April 19

Soap Carving For Kids

I enjoy trying out new arts and crafts activities as much as my daughters do.  It is fun to experiment, learn new skills and take creative risks in this way.  I recently came across the book Soap Carving For Children of All Ages, and found it a great inspiration to give soap carving a try. 


There are only a few supplies needed to soap carve and we made most of our own.  Ivory soap is best suited for carving (as the book says), it doesn't crumble like other soaps and since the company used to sponsor soap carving competitions they are like the official soap of soap carving!


Making the Tools: One tool needed for carving is a knife type wooden stick for taking off the sides of the soap bar.  We made ours using a tongue depressor (or popsicle stick).  We formed the point by rubbing the sides of the stick against sand paper until it became pointed.  On the other end of the stick we made a chisel tool  by rubbing only the widest side against the sandpaper. (My daughters didn't use the chisel at all, but older children probably would.) 


The second tool we made was like a spear, used for outlining the soap pattern and drawing details on the carving.  I found some small dowels in our craft box and we used a pencil sharpener to create the point.  


My oldest daughter decided to make a leaf, so I drew a leaf outline on her bar of soap with a permanent marker.  (My youngest daughter wanted a tree which proved unsuccessful and hence no photos of that.)  Choosing a doable pattern (or image) is the key to successful soap carving.  It is best to keep the image very simple.  Once the outline is drawn on the soap my daughter traced it with the "spear" tool, digging it into the soap to create the image.  The "ivory" lettering was removed by gently scraping the top.


The "knife" tool is then used to take off small pieces around the outline.  Once my daughter understood that she wasn't trying to cut off large chunks, but shave off the sides instead, it was pretty easy.  The soap itself, is softer to carve than one would think, and it doesn't take long to have a pile of shaving at the work mat. (Which reminds me, I wasn't prepared for the amount of shavings, covering the table or doing this outside would be best.)  The toothbrush is useful to brush away shavings from the carving, and carving edges can be smoothed by rubbing fingers around the image.


 The finishing touch is adding the details, like the leaf veins, in this pattern.   Both of my daughters enjoyed the soap carving and we will surely do this again.  I gave it a try myself, earlier in the week, to test it as a possible craft and made this heart.


This idea comes from the book, and after the carving is done it was painted with watercolor paint mixed with a few drops of water.  I chose to not introduce the painting to my daughters so that they could use their soap, as soap, for washing.

Thursday, April 12

Craft: Paper Molds from Cookie Molds


For some time I've been looking at cookie molds over the internet with the idea that it would be a fun way to make cookies or paper creations. I couldn't believe my luck when on my latest trip to the Goodwill store I happened to find two cookie molds. We used them once to make cookies and then decided we would take a try at paper molding (or casting as it may be called).

The activity is pretty simple and only uses a few supplies. First, we sprayed the molds with a nonstick spray to help prevent sticking. Next, we tore 6 or 7 paper towels into 1 inch pieces and put them into a blender. Our second time doing this we also added two half sheets (different colors each) of construction paper. Next, we filled the blender half full of warm water and let the paper soak for a few minutes.

After blending and once we had a watery mix of paper and paper towels (in this photo we had used just paper towels), we were ready for filling the molds.


This part proved to be a fun sensorial experience for my daughters. Placing a towel under the molds, we took handfuls of mixture and filled each mold with the paper mixture. Next, using a large sponge, we firmly pressed the sponges onto the molds to soak up the water and compress the paper into the mold.


The sponges were squeezed out into a bowl. We repeated this until all the water was removed. Also, at this point, extra paper mixture was added into the mold if needed.


I placed the molds into our toaster oven at 200 degrees for about 20 minutes (keeping a careful eye on things) to dry them quickly.


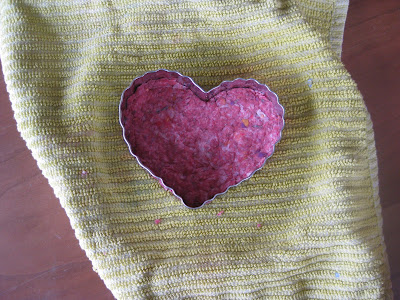
While using the molds I also wondered if this activity could be done with a cookie cutter so we tried that too. We used the same sponge method for removing water. (For this paper we used red, purple and yellow construction paper with the paper towels- and F.Y.I. -a little construction paper goes a long way.)


The next day we decorated the molded paper. We used watercolors on one.


The cookie cutter mold is on the top left and came out pretty good. I found the molded paper also looks attractive left as is.


We also decorated with glitter...lots and lots of glitter. Overall, my daughters loved making these because of the involved process of tearing paper, using a blender, sticking hands in water paper mess and sponging water up. The decorating was just as fun too.

Tuesday, March 27

Drawing Day: Tracing

Tuesdays are our drawing day. We have drawing journals and each Tuesday we sit down and draw in them in the afternoon. At some point yesterday, during play, my oldest daughter wanted to copy something, so I introduced tracing at the window. She enjoyed the concept of tracing so much that I printed off some simple images to trace for our drawing time today.


It was a sunny day so the images showed up very well through regular computer paper. I encouraged colored pencils, but they preferred markers. The papers were simply taped to the window.


The act of tracing encourages eye hand coordination and concentration. My daughters worked on their images and once they were traced, they were removed from the window to color at the table.


Both of my daughters were quite proud of their tracings. It was fun to separate the papers and unveil the work.


My oldest daughter enjoyed working on some more elaborate drawings.


I'm sure we will do this again sometime, and now that they've been introduced to the method, they can trace whenever they need or want to.

Wednesday, January 18

Typical Wednesday

After a somewhat atypical Tuesday, it was nice to get back into the rhythm of a typical Wednesday. Since the holidays, we've been slowly getting back into the routine. Baking day and cleaning day seem to always occur, no matter what, but we've been hit or miss with our drawing days, painting days, and craft days. To get started and back into the swing of things, I planned out the rest of the month including crafts, songs, finger plays, Montessori lessons and stories. I've found a little bit of planning goes a long way.


The unplanned parts of our day are left up to my daughters. Today, while my oldest daughter went to morning kindergarten, my youngest daughter played with the moon sand. After trying, and failing, at some of the internet recipes for moon sand, I ended up using some of their Christmas gift money to buy Moon Sand. In the past we've had an indoor (small) box full of sand for winter play but this winter we are just using the Moon Sand. Despite the expense, I don't think we'll go back to regular sand (inside) anymore. I find the Moon Sand far less messy, has a better texture and easier to shape than sand box sand.


My youngest daughter is getting so much better at independent play. At the start of the school year, she hardly knew what to do with herself while her sister was away at school. Now, she initiates activities and is able to play for a lengthy bit of time without even noticing my presence. Since reading How to Raise Your Spirited Child, by Mary Sheedy Kurcinka, I am now aware that she is an extrovert and so this change for her was not easy. I've learned that I need to schedule outings, play dates and in general be aware that she energized by being around other people and fades when that need is not met. (A totally foreign concept for an introvert like myself).


The craft we made today was found on pinterest. We cut our construction paper into heart shapes and then used baby oil and cotton swabs to create designs. (I do want to add- make sure you aren't giving baby oil to a child that may ingest it. It is unsafe for consumption.)


Both of my daughters really enjoyed this simple project. I loved the fact that I had everything on hand to make it.


The baby oil illuminates the designs when placed in the light. My youngest daughter taped the hearts to the front window. A little early for Valentine's day, but that's okay!

Tuesday, January 3

Easy Origami Animals

One present my daughter received for Christmas was this animal origami set (purchased from The Land Of Nod). I keep the set in our church "quiet" bag. The set comes with stickers to decorate the faces, but it is just as fun and easy to make one's own from scrap paper and draw faces, spots and details, which we'll do once we run out.


I chose the two most basic animals to share. You'll have to excuse the photos, they are a bit blurry. Before starting, make sure your paper is cut into 8 inch x 8 inch squares. The purchased papers come with dotted lines to indicate where each fold should be. It would be simple and maybe helpful to draw a light pencil line for a child.


Animal #1

Fold corner to corner to make a triangle


Fold one corner down to make an ear


Fold the other corner down to make an ear


Fold up the point at the bottom, behind the face.


Animal #2


Fold corner to corner to make the triangle


Fold the corner on the left in and the corner on the right in to make creases.


Then fold them behind the face.


Fold up the point at the bottom.


Lastly, fold down the very tip of that triangle to create the mouth/nose.


My daughter's are still learning how to fold the animals, but they do enjoy watching me do it slowly and then decorating. It makes a great quiet time activity.

Tuesday, October 11

Today's Drawing Day

Today was our drawing day. Usually my daughters free draw in their drawing journals on this day, using whatever crayons, markers, crayon rocks, block crayons, or colored pencils they choose. However, today we changed our routine a bit by using these cardboard tubes to hold large amounts of crayons. It made for some fun and pretty pictures, as well as developmentally purposeful work.


The tubes were cut shorter from paper towel roll cardboard. I wanted them to be short enough so that the crayons and tube would stand and not tip over while being filled.


Part of the fun of this drawing activity is choosing the crayons to put into the tube. This too is a good exercise in colors and color variation as well as the pincer grip.


Earlier in the day, before we actually used the cardboard crayon tubes, we made drawing pads for under our drawing papers. I was impressed with the idea of having a drawing pad after reading this tutorial on how to make a drawing pad. I like the idea of using drawing pads for two reasons. The first reason is because it prevents marks from getting onto the table or floor or wherever it is the child is drawing and secondly, because there is a difference between drawing on an extremely hard surface verses a more "giving" surface. I tried it for myself and found that I could tell a difference and in fact much prefer a drawing pad under my drawing/writing paper. I found that it also creates a softer line which is visually more appealing. (Try it using a magazine or newspaper and then a hard table and see if you prefer one over the other.) We made ours with a few layers of newspaper and recycled large/thick easel drawing paper as a cover.


Here is a photo of my youngest daughter using the tube filled with crayons. This activity requires the child to use large arm movements (the bigger the paper the better, paper on a roll on the floor would be fun too) and significant hand strength to grip the large cardboard tube. These movements and muscles are more than what is typically needed in a regular drawing session. The purpose of the activity is not detailed drawing but more an encouragement of movement, lines and curves, and color.


My oldest daughter tried the activity without the cardboard tube also, just as fun, with a few less crayons. After our drawing time, I stored the new drawing pads next to our art cupboard so that they can be used whenever the crayons come out.